
Why Every Serious Camper Needs a Portable Platform
A diy portable tent platform lifts your camping experience with added comfort and protection. Here’s what you can achieve:
- Escape wet conditions – Stay dry even when rain creates puddles around your campsite.
- Level uneven terrain – Create a flat surface on rocky, sloped, or bumpy ground.
- Protect your tent investment – Prevent ground moisture, dirt, and wear that shortens tent life.
- Keep bugs and critters out – Lift your sleeping area away from crawling insects and small animals.
- Add valuable storage space – Use the area under your platform for gear and supplies.
As one experienced camper noted: “This project gives the user a flat, off the ground, dry platform for a 7×7 tent. Tired of uneven ground, or a river running thru your tent? This project may work for you.”
Building your own platform is about more than comfort—it’s about protecting your tent investment. Platforms extend tent lifespan by preventing ground moisture damage and reducing wear from direct ground contact. For glamping businesses, this means lower replacement costs and happier guests.
The beauty of a DIY approach is customization. You can build folding modular sections, create adjustable legs for any terrain, and size your platform perfectly for your tent. A well-designed platform is valuable for both weekend trips and semi-permanent glamping sites.
I’m Caitlyn Stout, founder of Stout Tent. I’ve seen how a diy portable tent platform transforms camping comfort and success for glamping businesses worldwide.

Planning Your DIY Portable Tent Platform
Smart planning is key to building a diy portable tent platform. A good design is sturdy, portable, and easy to set up.
Unlike a permanent deck, a portable platform requires modularity and weight management. It must break down into manageable pieces that fit in your vehicle. Consider section connections and weight—these practical details are crucial for a platform you’ll use regularly.
Sizing Up Your Platform
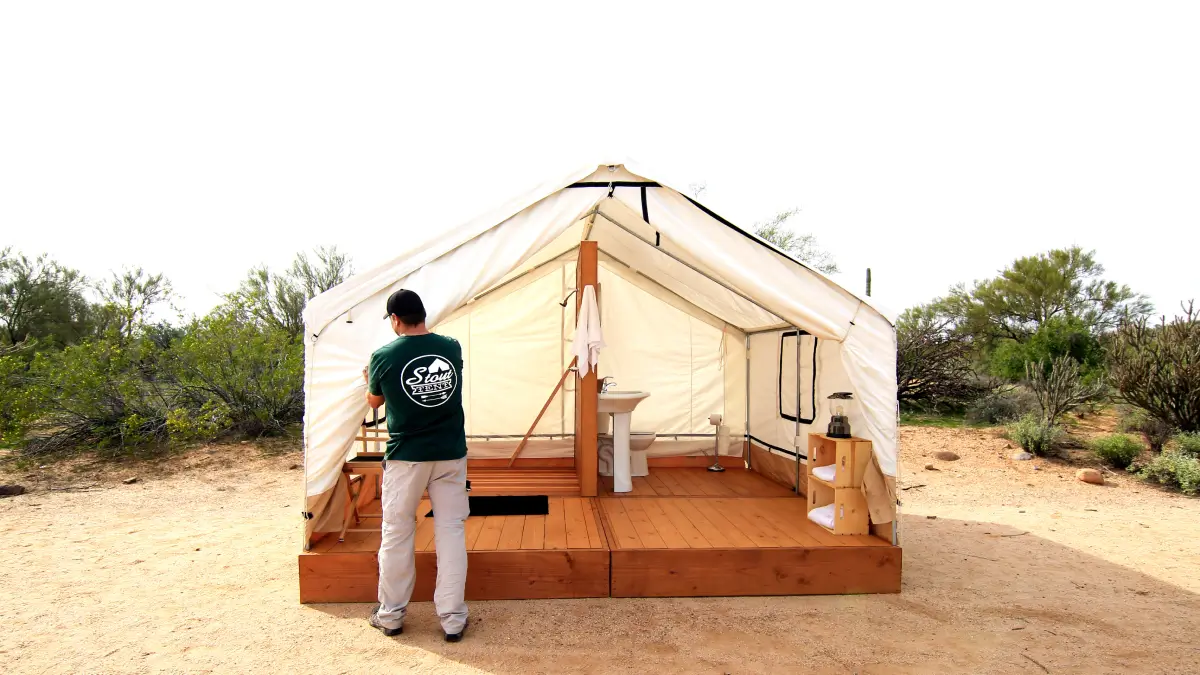
A simple rule for sizing: make your platform slightly larger than your tent’s footprint for walking space, gear storage, and water drainage. Adding 1-2 feet on each side is usually enough. For spacious Stout Tent bell tents, you might consider a more generous platform.
A small porch area is a great feature for leaving boots or enjoying your morning coffee off the wet ground. You should also factor in gear storage, deciding whether to keep items on or under the platform. Finally, ensure enough walk-around room for easy setup and adjustments.
Choosing the Right Materials: Wood or Aluminum?
Your material choice affects cost, weight, and comfort. Avoid PVC, which creates a bouncy surface. For a solid diy portable tent platform, choose wood or aluminum.
| Feature | Wood | Aluminum |
|---|---|---|
| Cost | More affordable upfront, ongoing maintenance costs | Higher initial investment, minimal long-term costs |
| Weight | Heavier sections (5×7 ft can exceed 100 lbs) | Much lighter with excellent strength-to-weight ratio |
| Strength | Excellent strength, but vulnerable to rot and insects | Very strong, resistant to corrosion and pests |
| Durability | Needs treatment and regular sealing | Highly durable with no sealing required |
| Weather Resistance | Requires sealing to prevent water damage | Naturally weather-resistant |
| Ease of Use | Easy to cut with standard carpentry tools | Requires specialized tools for cutting and joining |
Wood is popular because it’s affordable and easy to work with using standard tools. Use pressure-treated lumber or cedar for rot resistance. Be aware that a wooden section can be heavy, often requiring two people to lift.
Aluminum is ideal for frequent travelers due to its light weight. However, it’s more expensive and requires specialized tools for fabrication.
Designing for Portability and Easy Setup
Modular design is key. Build smaller, interlocking sections instead of one massive platform.
Folding sections with heavy-duty hinges save transport space, making large platforms fit into smaller vehicles. Use T-nuts and bolts or cam fasteners for quick assembly and disassembly instead of permanent screws.
Removable, adjustable legs are essential for transport and leveling on uneven ground. Repurposed walker legs are a creative, budget-friendly option.
Measure your vehicle’s cargo space and plan for manageable section weights. A practical design ensures you’ll use your platform often. For more ideas, check out our Tips & Tricks section.
Essential Tools and Materials for Your Build
Building a diy portable tent platform is easier and safer with the right tools and materials. You may already own many of these tools, and others can be rented or borrowed.

Essential Tools
You’ll need a tape measure for accurate cuts and a level to ensure a flat, stable platform. A circular saw or miter saw is needed for cutting lumber and plywood, and a power drill is essential for drilling holes and driving screws. A wrench set is necessary for bolts, and a mallet helps fit pieces together. Always use safety glasses and work gloves.
Core Materials & Hardware
Quality materials are crucial for durability and performance.
For the frame, use pressure-treated lumber or cedar (2x4s or 2x6s) for its resistance to rot and insects, with 4x4s for the legs. Use 1/2-inch or 3/4-inch exterior-grade plywood for the decking, as it’s made with waterproof glue.
For portability, use carriage bolts, T-nuts, and washers for strong, removable connections. Use galvanized or stainless steel heavy-duty hinges for folding sections. Attach the decking with exterior-grade deck screws. For leveling, use adjustable feet components like threaded rods or telescoping tubes.
Finally, protect the wood with marine paint or wood sealer to shield it from moisture and UV damage.
Step-by-Step: How to Build Your DIY Portable Tent Platform
Now it’s time to build your diy portable tent platform! Building in modular sections allows you to work at your own pace. You can build the platform at home and transport it to your campsite for quick assembly.
Step 1: Constructing the Modular Frames
The frame is the platform’s backbone. Each modular section must be sturdy and connect seamlessly. Cut your lumber to size according to your design, accounting for the frame’s thickness when cutting inner joists. Assemble each frame section by creating the outer rectangle with 2x4s or 2x6s, ensuring it’s square. Add center joists every 12-16 inches for support, using joist hangers for added strength. For portability, use bolts and T-nuts to connect the sections for a solid, easily disassembled connection.
Step 2: Adding the Decking Surface
With the frames built, it’s time to add the decking. Cut the exterior-grade plywood to fit each frame section. Attach the decking with plenty of screws into every joist and around the perimeter to prevent squeaking. If using individual deck boards instead of plywood, leave small drainage gaps (1/8 to 1/4 inch). Finally, sand all edges smooth to prevent splinters.
Step 3: Creating Adjustable Legs for Uneven Terrain
Adjustable legs are a key advantage, turning any uneven campsite into a level foundation. Telescoping pipes are a robust option, while a simpler method uses threaded rods and nuts. Once assembled on-site, use a level and patiently adjust each leg until the platform is perfectly flat for maximum comfort.
Step 4: Assembling and Securing Your Tent
The final step is assembling the platform and securing your tent. Connect the modules using the bolts and T-nuts, then do a final leveling check. Anchor the tent floor to the platform since you can’t use stakes. For Stout Tent bell tents, use heavy-duty screw hooks or lag bolts to secure the D-rings. Manage guy lines carefully by attaching them to short posts or heavy-duty anchors on the platform’s edges to maintain proper tension. Correct guy line angles are crucial; our How to Stake Your Bell Tent guide explains the principles for both ground and platform setups.
Pro Tips and Common Mistakes to Avoid
Building a diy portable tent platform is rewarding. Here are some pro tips and common mistakes to avoid, based on our experience helping campers.
Advanced Customizations for Your DIY Portable Tent Platform
Once you’ve mastered the basics, you can add custom upgrades.
- Build a porch extension: This adds a perfect spot for coffee or muddy boots. Many Stout Tent customers find this single addition transforms their experience.
- Add snap-on outdoor carpet: This provides a soft, cleanable surface and keeps dirt out of your tent. Use heavy-duty snaps to attach weather-resistant carpet squares.
- Paint or seal the wood: This is essential protection against water, UV damage, and rot. A semi-transparent stain protects the wood while enhancing its natural grain.
- Integrate under-platform storage: Sliding trays or enclosed compartments keep gear dry, organized, and out of sight.
Common Pitfalls and How to Sidestep Them
Here are the most common mistakes and how to avoid them:
- Underestimating weight: A large wooden section can easily exceed 100 pounds. Plan for smaller, manageable sections. For solo campers, consider aluminum framing to save weight.
- Using weak frame materials: This results in a bouncy, unstable platform. Use pressure-treated lumber (2x4s minimum) or aluminum channels for a rock-solid feel.
- Poor joinery: This creates instability. Use strong, reliable carriage bolts with T-nuts for modular connections and heavy-duty, outdoor-rated hinges for folding sections.
- Forgetting to weatherproof wood: This leads to rot and warping. Apply marine-grade paint or a quality wood sealer to all surfaces and allow it to cure completely.
- Incorrect guy line angles: This can stress tent seams, causing sagging or tearing. Use perimeter posts or heavy-duty anchors on the platform to maintain proper angles.
- Not accounting for drainage: This can lead to pooling water and mold. Leave gaps between deck boards or ensure a slight slope on plywood surfaces for runoff.
Building your own platform is a learning process. If you encounter issues like leaks from a poor setup, our Troubleshooting Leaking guide can help. Your diy portable tent platform will evolve with your skills, becoming a valuable part of your camping gear.
Frequently Asked Questions
Here are answers to common questions about building a diy portable tent platform.
How much does a DIY portable tent platform cost?
You control the budget when building your own platform. The final cost depends on size, materials, and design complexity. Material costs are the biggest expense; a basic wood platform is affordable, while premium materials like cedar or aluminum cost more upfront but save on long-term maintenance. DIY savings are substantial, as you only pay for materials, not labor. A simple platform is also cheaper than one with complex features like folding sections or adjustable legs.
How do I make the platform easy to transport?
True portability comes from a design that breaks down into manageable sections. Use modular design, creating smaller sections that bolt together. Manageable section weight is crucial; design each module to be easy to lift. Folding mechanisms with heavy-duty, outdoor-rated hinges can halve the storage space needed. Removable components like legs and hardware are also essential for transport.
Can I install a stove in a tent on a platform?
Yes! A wood stove on your diy portable tent platform is a great upgrade for true glamping comfort. Safety is paramount: ensure proper stove placement with adequate clearance from tent walls. A heat-resistant mat under the stove is non-negotiable to protect the platform from heat and embers. A stove jack provides a safe exit for the stove pipe. Many Stout Tents are stove-ready, and installing one is straightforward. For detailed instructions, see our Stove Jack Installation Guide (Long Version). Follow safety procedures carefully to prevent accidents.
Conclusion: Enjoy Your Upgraded Camping Setup
Building your own diy portable tent platform is a rewarding project that will be a game-changer for your camping trips. Your platform will transform every trip: you’ll sleep better on a level surface, stay dry, and your tent will last longer, protected from ground moisture and wear.
This project lifts your entire camping experience, providing a foundation for comfort and luxury. Sleeping off the ground, away from critters and moisture, with added storage space, makes every trip better.
At Stout Tent, we’ve seen how a well-built platform combined with a quality canvas tent creates the ultimate outdoor experience, from desert festivals to lush forests. Our expertise comes from producing large-scale glamping events worldwide.
Your platform’s modular design is versatile, perfect for car camping, remote spots, or backyard glamping. This rewarding project is your gateway to better outdoor living. For more expert advice, see our Deck and Platform Guide.
Now, get out there and enjoy your liftd camping trips. Happy building!
