Why a DIY Tent Platform Lifts Your Canvas Bell Tent Experience
Building a diy tent platform transforms your canvas bell tent setup from basic camping to luxury outdoor living. Here’s what you need to know to get started:
Essential Steps for Building a DIY Tent Platform:
- Plan your design – Choose permanent (glamping sites) or portable (weekend camping)
- Gather materials – Pressure-treated lumber, galvanized fasteners, concrete for posts
- Prepare the site – Level ground, mark dimensions, dig post holes
- Build the frame – Install perimeter beams, center supports, and joists
- Add decking – Space boards 1/8″ apart for drainage, secure with screws
- Finish and seal – Stain and waterproof for weather protection
A well-built platform protects your canvas bell tent from ground moisture, creates better airflow to prevent mold, and provides a stable surface that extends tent life significantly. The research shows platforms can cost anywhere from $450 for basic builds to several thousand for complex designs.
The benefits go beyond protection. Platforms keep your tent cleaner, deter insects and small animals, and create additional outdoor living space with porch extensions. For glamping businesses, platforms are essential for guest comfort and tent longevity.
As Caitlyn Stout, founder of Stout Tent with experience in canvas tent construction and glamping site development across six continents, I’ve seen how the right diy tent platform can transform both weekend camping trips and commercial glamping operations. My hands-on expertise in tent durability and site planning will guide you through building a platform that maximizes your canvas bell tent investment.

Planning Your Tent Platform: Design, Materials, and Costs
Building a diy tent platform for your canvas bell tent requires careful planning. Making smart decisions on design, materials, and budget at the start will save you headaches and money later on.
Choosing the Right Design: Permanent vs. Portable
Your first decision is whether you need a permanent or portable platform. Consider how you will use your canvas bell tent to make the choice clear.
Permanent platforms are ideal for a dedicated spot, like a family campsite or a glamping site. These sturdy structures become part of the landscape, offering rock-solid stability. A permanent diy tent platform transforms your canvas bell tent into a semi-permanent retreat, keeping it consistently lifted and dry. This protection from ground moisture and pests dramatically extends its lifespan.
Portable platforms are for campers who explore different locations. A modular, portable design gives you the freedom to bring the comfort of a platform anywhere. These systems often fit in a car trunk and can be set up quickly.
Here’s how they stack up:
| Feature | Permanent Platform | Portable Platform |
|---|---|---|
| Pros | Rock-solid stability, maximum tent protection, year-round durability, improved aesthetics | Ultimate flexibility, easy transport, adapts to any location, quick setup |
| Cons | Higher upfront cost, significant labor investment, can’t move it | Less robust than permanent, requires setup each time |
| Best For | Glamping sites, dedicated camping spots, harsh weather areas, long-term setups | Weekend warriors, location variety, temporary events, exploring new areas |
| Materials | Heavy-duty pressure-treated lumber, concrete footings, premium decking | Lighter lumber, aluminum components, modular connectors, hinged designs |
Essential Materials and Tools
Quality materials ensure your platform is durable and low-maintenance, matching the quality of your canvas bell tent.
Pressure-treated lumber is the standard for most diy tent platforms. This wood resists rot, decay, and insects. For framing, 2×6 joists and 4×4 posts provide excellent strength.
Cedar offers natural weather resistance and a beautiful look, though at a higher cost.
Composite decking costs more than wood but never needs staining, won’t splinter, and is extremely durable—a great choice for glamping setups.
Your fasteners are also important. Use galvanized screws and stainless steel hardware to prevent rust and structural weakness. Joist hangers and post-top connectors simplify assembly and add strength.
For foundations, concrete footings provide maximum stability for permanent platforms. Gravel pads offer excellent drainage, and deck blocks work well for slightly uneven ground without deep digging.
Essential tools for your diy tent platform project include a circular saw, a cordless drill, a level, a tape measure, a shovel, and safety gear.
Budgeting for Your Project
Platform size and material quality are the biggest cost drivers. Basic pressure-treated lumber is affordable, while premium cedar or composite decking can significantly increase material expenses. Both approaches create excellent platforms for your canvas bell tent.
Design complexity also affects your budget. A simple rectangular platform is more efficient than custom shapes or multi-level designs.
The DIY approach saves substantial money on labor. A basic diy tent platform requires a modest investment in materials, while more elaborate designs cost more but create spectacular glamping experiences. Always get current quotes from local suppliers when planning your project.
Your platform investment protects your canvas bell tent investment, extending its life by years while dramatically improving comfort.
The Ultimate DIY Tent Platform Build: A Step-by-Step Guide

With your plan and materials ready, it’s time to build. Follow these steps to construct a sturdy and reliable base for your canvas bell tent.
Step 1: Site Preparation and Foundation
A strong foundation is critical for a stable diy tent platform. Without it, your canvas bell tent could end up lopsided or unstable.
First, choose your location wisely. Look for a spot that’s relatively level with good drainage. Clear the area of any rocks, debris, or undergrowth.
Next, mark your dimensions using stakes and string to outline the platform’s perimeter. Double-check your measurements to ensure it’s square and sized correctly for your canvas bell tent, allowing extra space if desired.
If you’re building a permanent structure, you’ll need to dig post holes. They should be deep enough to get below the frost line in cold climates, with gravel at the bottom for drainage. Before you dig, always remember to call 811 to avoid underground utilities.
Finally, set your posts and consider pouring concrete footings. This anchors the platform firmly. Ensure your posts are perfectly plumb and level before the concrete sets.
Step 2: Building the Frame and Joists
With the foundation in place, you can build the frame that will support your decking.
Start by attaching your perimeter beams to the posts. Ensure they are perfectly level and square—this is critical for a stable result. Use galvanized screws for durable connections.
For larger platforms, install a center beam for additional support. A post-top connector can make this job easier and more secure.
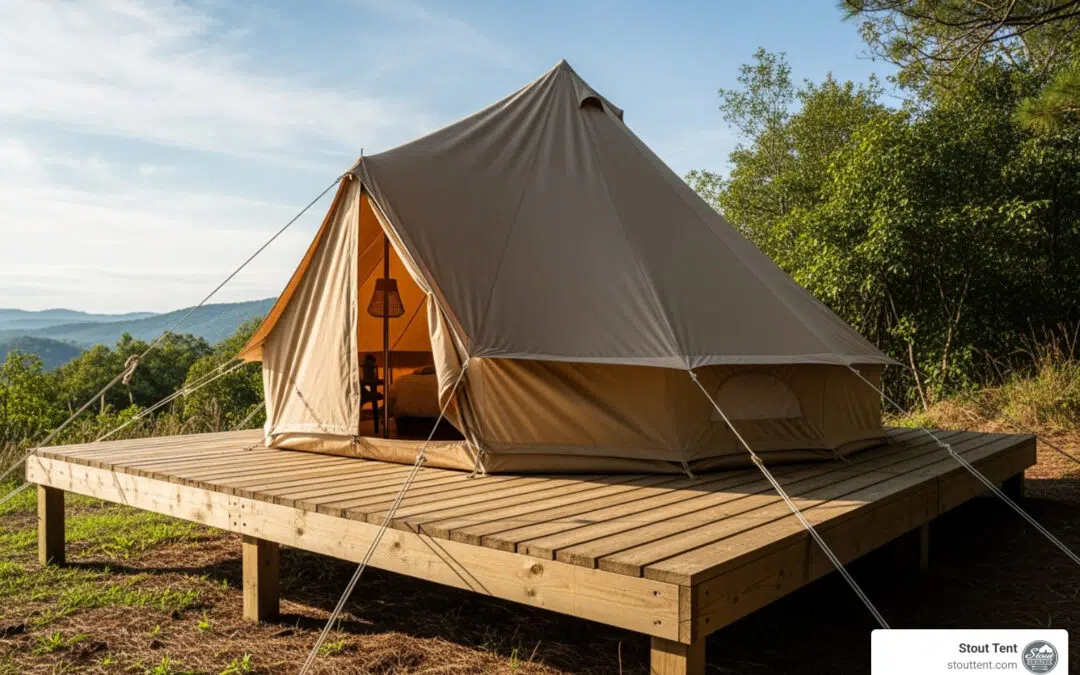
Next, add the joists. These are the horizontal members that provide direct support for your decking. We recommend spacing joists 16 inches apart on center for optimal strength. Use joist hangers to securely attach them to your beams. This creates a robust grid that can handle the weight of your tent, furniture, and occupants.
Step 3: Installing the Decking
Installing the decking is the final construction step for your diy tent platform.
Begin by laying your deck boards across the joists, starting with a perfectly straight first board. Remember to leave a small gap, typically 1/8″ to 1/4″, between boards for drainage. This allows water to run off and accommodates the natural expansion and contraction of the wood.
Next, fasten the boards to the joists. Drive two galvanized screws through each deck board into every joist it crosses for a secure, squeak-free surface.
Finally, clean off any sawdust or debris. To protect your investment, we highly recommend staining and sealing the wood for weather protection. This shields it from UV rays, moisture, and general wear.

Setting Up Your Canvas Bell Tent on the Platform
Once your diy tent platform is built, it’s time to set up your canvas bell tent. This requires a different approach than pitching on the ground, but the result is a more stable, dry, and comfortable setup.
How to Secure Your Bell Tent to a DIY Tent Platform
Forget hammering stakes into the ground. Your diy tent platform requires a more sophisticated approach to anchoring your canvas bell tent. The key is creating a solid connection between the tent’s groundsheet and the wooden deck.
Start by anchoring the groundsheet using the D-rings at each corner of your canvas bell tent. Instead of stakes, use heavy-duty screw hooks threaded directly into your platform decking. These provide a secure anchor point that won’t pull out under tension.
For a more permanent solution, consider using bolts and washers for the D-rings. Drill pilot holes through the platform, then secure each D-ring with a galvanized bolt, washer, and nut underneath the deck. The washer distributes the load and prevents the fabric from tearing.
The goal is to achieve a tight, wrinkle-free floor. Adjust each anchor point until the groundsheet lies perfectly flat. This prevents water from pooling and keeps your canvas bell tent’s interior pristine.
For more detailed guidance on proper anchoring techniques, check out our comprehensive guide on How to Stake Your Bell Tent, which covers principles you can adapt for platform use.
Managing Guylines on a Deck
Your canvas bell tent’s guylines need special attention on a platform to maintain proper tension and structure. The liftd position of your diy tent platform changes the geometry of these support lines.
The importance of correct guyline angle cannot be overstated. When a tent is on a platform, the guylines may not reach the ground at their intended angle, which can stress seams and compromise stability. This is critical for canvas bell tents, which rely on proper guyline tension for their shape and wind resistance.
The solution is to install dedicated posts for guylines around your platform’s perimeter. These posts, typically 2-3 feet tall, can be mounted to the deck or just off the edge. They allow your guylines to extend at the proper angle, maintaining the structural integrity of your canvas bell tent.
Dedicated guyline posts also excel at preventing tripping hazards. They keep lines visible and safely positioned while maintaining tent structure exactly as intended.
For comprehensive setup guidance including guyline management, explore our Bell Tent Setup resources for additional tips and techniques.
Customizations, Alternatives, and Common Mistakes
A basic diy tent platform is a great start, but customizations can create a true outdoor retreat. Here, we’ll explore popular upgrades, budget-friendly alternatives, and common mistakes to avoid.
Customizing Your DIY Tent Platform
Think of your diy tent platform as the stage for your outdoor living experience. With a few thoughtful additions, you can create a space that rivals any luxury glamping resort.
Adding a porch for seating is a popular upgrade. Extend your platform 3-4 feet beyond the tent’s entrance to create a perfect spot for chairs and relaxation. This simple addition creates a true outdoor living space.
For sloped terrain, adjusting leg height for uneven terrain is key. By cutting support posts to different lengths, you can create a level platform on a hillside, which improves drainage and stability for your canvas bell tent.
Building a round or hexagonal platform is a great way to complement the circular shape of a canvas bell tent. This design is visually stunning and provides continuous walking space around the tent.
The customization possibilities are endless. For more inspiration on creating the perfect glamping atmosphere, check out our Glamping Decor collection.

Alternatives to a Wooden Platform
If a full wooden platform doesn’t fit your needs, simpler solutions are available.
Gravel pads are a great alternative, offering excellent drainage. Create a 1.5-2 inch thick, firm, level surface using decomposed granite or fine gravel, framed with landscape edging. This keeps the tent floor dry with less cost and maintenance than wood.
This approach works well for semi-permanent setups where you want something more refined than bare ground. The cost comparison is favorable, as you’ll spend significantly less on materials while still getting most of the benefits of elevation and drainage.
Ground preparation for canvas bell tents on gravel requires creating a smooth, level surface. Compact the gravel properly and check for sharp edges. A ground cloth can provide extra protection.
Common Mistakes to Avoid
Learning from common pitfalls will save you time, money, and frustration.
Poor site selection is a common mistake. Avoid areas where water collects. Choose a location with good natural drainage to prevent moisture problems for both the platform and your canvas bell tent.
Using untreated wood is a costly error. It will not survive outdoors. Always use pressure-treated lumber for any parts exposed to moisture to prevent rot and ensure longevity.
Forgetting to level the structure is critical. An unlevel platform puts uneven stress on your canvas bell tent, which can cause premature wear and damage. Take the time to get it perfectly level during construction.
Incorrectly securing the tent guylines can compromise your tent’s structure. Guylines must extend at the proper angle. Staking them to the ground from a raised platform creates incorrect geometry. Install dedicated posts around the platform to maintain the correct angles.
For more detailed guidance on preventing moisture issues, our Troubleshooting Leaking resource covers the essentials.
Frequently Asked Questions about Building a Tent Platform
Here are answers to the most common questions about building a diy tent platform for a canvas bell tent.
How much does it cost to build a tent platform?
The cost depends on size, materials, and design complexity. A basic 12’x16′ platform using pressure-treated lumber might cost around $450-$500 for materials. Using premium materials like cedar or composite decking, or creating a more complex design, can increase the cost to $1,500-$3,500 or more. The DIY approach saves significantly on labor costs, which can double the project’s total price.
Can you build a tent platform on uneven ground?
Yes. Platforms are an excellent solution for sloped campsites. Use posts of varying lengths set in concrete footings to create a perfectly level surface. On uneven ground, proper foundation work is even more critical. Ensure each post is plumb (vertical) and the footings are solid. This allows your canvas bell tent to sit level, making otherwise unusable scenic spots comfortable.
How do you protect a wooden tent platform from the weather?
Start with smart material choices, like pressure-treated lumber, which resists rot and insects. After construction, finish the wood with a quality stain and waterproof sealant to protect it from moisture and UV rays. Perform regular maintenance by reapplying the sealant every 1-2 years to extend the platform’s life. Finally, ensure proper drainage by leaving 1/8″ to 1/4″ gaps between deck boards and allowing for airflow underneath the platform.
Conclusion
Building a diy tent platform is a rewarding project that transforms your canvas bell tent experience. You’re not just building a deck; you’re creating a foundation for comfort, durability, and countless memories.
A platform protects your canvas bell tent from ground moisture and pests, significantly extending its life while eliminating the discomforts of uneven, damp ground. Your investment pays dividends in every aspect of your outdoor adventures.
At Stout Tent, we know that a quality tent deserves a quality foundation. Our canvas bell tents are built to last, and a well-made platform ensures you get the most out of your investment.
Check out our comprehensive Deck and Platform Guide for more expert tips. Your Glamping Tent adventure starts with a solid foundation.
